Showing posts with label dessert. Show all posts

Wednesday, July 10, 2013

i'm back....

well, I took a looooooong break and am back and ready to cook! luckily, just in time for the annual 4th of july picnic. my new obsession is Pinterest so this recipe is courtesy of one of my pins and this fantastic website...

 
it was really easy. you need:
 
 
2 bags light blue candy melts (found in the baking aisle of craft stores/wal-mart)
1 – 10.5 ounce bag large marshmallows
1 box graham cracker crumbs (I used Teddy Grahams)
1 – 6.6 ounce bag cheddar goldfish
Large white pearl nonpareils
20 lollipop sticks
 
- Melt blue candy melts according to package. I recommend placing chocolate candy in a microwavable bowl and melting in 30 second increments, mixing in between. Do not over-melt or the chocolate will be difficult to work with. Start with one package and see if you need more.

- Place lollipop sticks in marshmallows. Dip marshmallows into the chocolate candy. Use a knife to get excess chocolate off the marshmallow bottom.

- Dip the bottom in graham cracker crumbs. Add a goldfish and 2 white pearl non pareils.

- Allow to cool and then enjoy! If you are making this a day in advance, make sure to place your pops in an air tight container or cover with saran wrap so they don’t go stale.


Feedback was pretty good. The candy melts are sweet but everyone
really liked them. They went really fast too!

Monday, September 19, 2011

day 37 = maple brown sugar scones


let's just face it, we were itching for dessert. the problem was, i had nothing in the house and couldn't convince charley to make me cookies. so i googled "desserts with brown sugar" and found this recipe from howsweeteats.com. the only problem was, i didn't have some of the ingredients (mainly bacon!) so i adjusted the recipe to what i had on-hand. i think i'll try again sometime when i do have the bacon because it sounds really interesting. here's what i did:

step 1: if you don't have buttermilk, make it yourself!

put 1 tbsp white vinegar (or lemon juice) in a 1 cup measuring cup and fill to the top with milk.
let sit for 5 mins and you have your very own buttermilk.


step 2: gather your base ingredients and preheat oven to 425 degrees

  • 3 1/4 cups flour
  • 1/3 cup brown sugar
  • 2 1/2 tsp baking powder
  • 1/2 tsp baking soda
  • 1/2 tsp salt
  • 1/2 tsp cinnamon (use more!!)
  • 1/4 tsp nutmeg
 
step 3: put all the base ingredients in a large bowl and whisk together


step 4: cut 3/4 cups cold butter into small squares. cut the butter into the base mixture until it resembles course crumbs (like how you make pie crust -- i used 2 knives to cut the butter).


step 5: stir in buttermilk and 1/4 tsp vanilla. fold in a handful of raisins.


step 6: roll out on floured surface and kneed gently. divide in half and pat into 7in circles.
brush with melted butter and sprinkle with brown sugar.


step 7: put in 425 degree oven for 12 mins.
  
step 8: while it's cooking, make the maple glaze.

  • 1 1/2 tbsp maple syrup
  • 1/4 tsp vanilla extract
  • 1 cup powdered sugar
  • drop of water (i used over 1 tsp)
mix all the maple syrup, vanilla and powdered sugar together. add water 1/4 tsp at a time until gets to desired consistency (should be able to drizzle overtop).


step 9: when the scones are out of the oven, drizzle overtop and let cool.


sarah:
i tried them straight from the oven and did not think they were all that great. the scones didn't have a lot of flavor and the maple glaze was really sweet. i really didn't think much of them until i called charley today and he said he'd eaten a bunch and really like them. so when i got home today i tried one and he was right! they must need to cool and settle in before you eat them. in fact, i think i am going to go grab another while charley writes his comments...

charley:
i am writing this after eating about 5 of these!  the only critique i could recommend from personal preference would be add more raisins and more cinnamon otherwise they are perfect the way they are.  they don't leave your mouth feeling dry and you keep wanting to go back!

enjoy!

Tuesday, September 13, 2011

day 34 (part II) = biscuit like cookies


sarah:
i got hungry and needed something sweet. i have Jamie Oliver's "Jamie's Food Revolution" cookbook and so i grabbed that and attempted his cookies. i think i did something slightly incorrect because mine didn't brown around the edges even though i put it in the oven for more time then required. oh well, i tweaked the recipe a bit so maybe that was it. i still liked them. they are not buttery sweet cookies (even though there is a TON of butter in them), they are more like biscuit cookies.

here's what i did:

step 1: gather your ingredients
  • 9 tbsp butter, softened (let sit out about 15 mins)
  • 1/2 cup superfine sugar (bakers sugar)
  • 1 large egg
  • 1 cup flour
  • 1/4 quick cook oatmeal (not instant)
  • 1/4 tsp baking powder
  • 1/2 tsp salt
  • 2oz semi-sweet chocolate


step 2: whisk together flour, oatmeal, baking powder, and salt


step 3: beat egg with a fork


step 4: mix butter and sugar together. add egg. stir in oatmeal by hand


step 5: chop chocolate and hand stir into batter


step 6: preheat oven to 375 degrees and freeze batter for 15 mins to harden


step 7: roll into balls and place on cookie sheet lined with parchment paper. cook for 10 mins. transfer to wire rack to cool completely and crisp up!


enjoy!

Monday, September 5, 2011

day 30 = banana cream pie


sarah:
this was my first attempt (at least that i remember) at making a pie crust. i really liked it, but it reminded me more of the wonton chips you get at a chinese restaurant then pie crust. i liked it though. there are quite a bit of steps, so have fun watching them!

make the pie dough:
start by getting a bowl of ice water ready


whisk together: 1 1/4 cup all purpose flour, 1 tbsp sugar, and 1/4 tsp fine sea salt
cut in cubes of: 5 tbsp chilled butter and 2 tbsp chilled vegetable shortening
using 2 knives: cut butter and shortening into flour mixture just until form large, pea size crumbs 


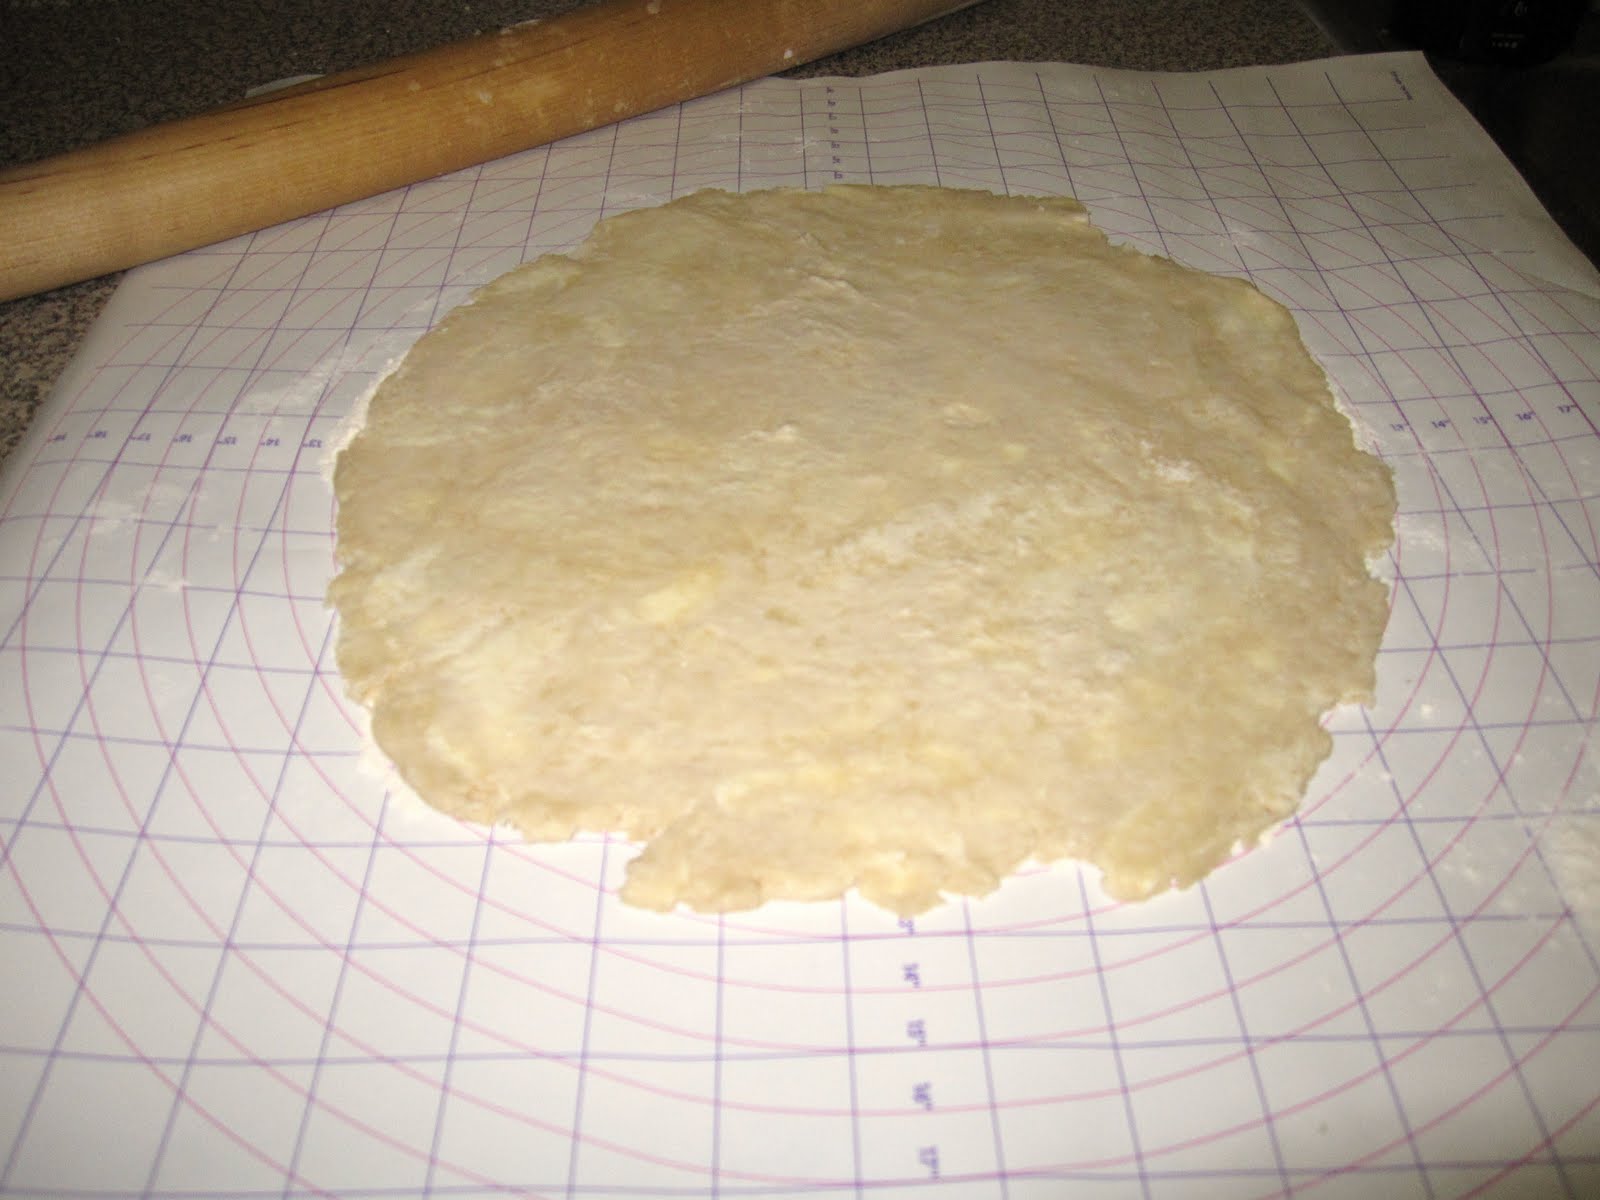
drizzle 1/4 cup ice water over mixture until forms moist clumps. add a little more water if dough seems too crumbly (i used a bit more). wrap in plastic wrap and let dough refrigerate 30 mins or up to 2 hrs. can also freeze wrapped in aluminum foil for 1 month. 


 meanwhile, preheat the oven to 375. roll out the dough when ready to 12 inches in diameter. place in a pie tin, cover with aluminum foil, and use pie weights to hold it down.
bake for 12-15 mins, until slightly golden. remove foil and weights and bake another 12-15 mins.
put on wire rack to cool completely.


make the filling:
set aside another large bowl of ice water. in a heatproof bowl, mix 4 egg yolks.


in a small bowl, whisk 1/2 cup milk and 1/3 cup cornstarch. gradually whisk milk mixture into yolks.


in a saucepan, combine 2 1/2 cups milk, 2/3 cup sugar, 1/4 tsp vanilla, and 1/8 tsp salt. place over medium heat and bring to a simmer, stirring to dissolve the sugar. gradually whisk the hot milk mixture into the egg mixture and return to saucepan. heat over medium heat until the mixture comes to a boil, whisking constantly. it will start getting very thick. reduce heat to low and let bubble for 30 seconds. remove from heat and whisk in 2 tbsp butter. put in a bowl, cover with plastic wrap, poke with holes to let the air escape, and put in prepared bowl of ice water.


very thinly slice 2 bananas, and place in cooled pie crust. spread filling on top. cover with plastic wrap and refrigerate at least 1 hour.


make the whipped cream:
in a chilled bowl, combine 1 cup heavy cream, 2 tbsp sugar, and 1/2 tsp vanilla.
beat at med-high speed until soft peaks form. use immediately or cover and refrigerate up to
2 hours before serving.


make the chocolate shavings:
use a vegetable peeler to make chocolate shavings out of a 1oz square of semisweet chocolate. refrigerate for 10 mins to firm up.


that's it!

charley:
well we may have found a first that i wasn't completely in love with.  the bananas were great and the cream was wonderful, but i didn't like the crust.  it had something about it that just didn't go with the rest of the pie.  all in all it was great, but i will not be eating the crust (i will just leave that for sarah as she liked it!)

enjoy!

Sunday, July 10, 2011

day 19 = espresso caramel bars

sarah:
last night i made pasta out of the "Giada at Home" cookbook and started her espresso caramel bars. i finished it up today because they take a while (not hands-on time, but allowing it to cool) to bring over to a friends house for dinner.

your can view the recipe at foodtv.com. i just have a few recommendations:

 - i found the crust had way too much butter so i poured the excess out and blotted the crust with paper so it wasn't so saturated.

 - i used coffee instead of espresso, but it still had a great flavor.

 - the chocolate is really rich. i might cut it down or use milk chocolate (just my preference). everyone else really liked it this way!

charley now asked me to make this his "favorite" over the oreo bliss from day 4 so this must be really good! check it out...

charley:
another great dessert that i will need to request she takes to the office.  this one is probably not on the healthier side, but anything in moderation is never too bad.  the problem is that i have no will power when it comes to dessert and she will need to take them away from me so that i don't eat them all!!!!

enjoy!

Saturday, July 2, 2011

day 16 = cheeseburgers it is!


sarah:
thank you to everyone who voted on what i was going to make for the 4th of july picnic. in the end, these were just too cute to pass up! they are supposed to have a sesame seed bun, but i agree that sesame seeds on a dessert seem a little odd. if you want a true cheeseburger bun though, put a little egg wash on top and add a sprinkle of sesame seeds. these were really simple and fun to make.

here's how you do it:

step 1: gather the ingredients
  • 1 box vanilla wafers (need at least 80)
  • 1 pkg grasshopper cookies (need 40)
  • 1/2 cup vanilla frosting
  • 1/2 cup coconut flakes
  • red, yellow, and green food coloring

step 2: prep the ingredients

  • mix vanilla frosting with food coloring in a bowl. use 2 drops of red and 8 drops of yellow (1 to 4 ratio). tweak if needed to get the perfect "cheese"
  • in a ziploc bag, mix coconut and 1 drop green food coloring. shake well and tweak if needed to get the perfect "lettuce"

step 3: assemble
  • put a drop of frosting on the flat side of a vanilla wafer
  • place a grasshopper cookie over top
  • add a glob of frosting
  • sprinkle with coconut
  • add a drop of frosting to another flat side of wafer
  • smoosh it all together and the cheese will "ooze" like a fine cheeseburger!

step 4: let's eat!


charley:
i would admit when she first presented options for what she should cook for the 4th of July i picked the strawberries due to the colors and i love strawberries in sugar.  after seeing her make these, how real they look and how good they taste i am glad she went with these.  for those who do not like coconut, i tend to agree, but the brand she used didn't overwhelm the burger.  in fact the grasshopper had the most taste to it and i love mint and chocolate.  this is one of those dishes that adds all the things i like and makes something i can say i loved.  in fact typing about it is making me want another, too bad they need to be saved for the 4th of july picnic :(


**if you want to see the list of options that did not make the chopping block, take a look at the 'day 14' blog. maybe another time...


enjoy!

Monday, June 27, 2011

day 14 = what am i going to make for 4th of July?


each year i make something cute and fun for the kids on 4th of july. each year i agonize about what to make, finally pick something, scramble to get the ingredients, and stay at the beach a little longer than i should (i need to get a tan!) and then have to rush to put something together.


i'm sure this year will be no different, but this year i'll let you in on my thoughts... we'll just have to wait to find out which one it is!


2011 --- what do you think????


past years if you want to drool...


enjoy!

Monday, June 20, 2011

day 10 = last-minute lemon bars


sarah:
alright, two weeks ago we bought bananas at costco. i used a few to make the banana chocolate chip bread on day 8. they were clearly not ripe enough, but i was eager to try the recipe. i left the remaining 4 bananas out for the last few weeks and was so excited last night when i realized i could make round two of banana bread tonight because they were finally the perfect ripened bananas. i got home early tonight, popped out of work clothes and into comfy clothes, washed my hands, and stared at an empty counter. charley "cleaned" and tossed my beautiful bananas in the trash.

i had no clue what to make instead. so, i entered the following ingredients into the search list on allrecipes.com: "butter", "sugar", "eggs", and "flour."

one of the first recipes that came up was for lemon bars. i tailored it a little and this is quite possibly one of the easiest desserts i've ever made. not a lot of cleanup either!

1/2 cup butter, softened
1/4 cup white sugar
1 cup all-purpose flour

2 eggs
3/4 cups white sugar
2 tbsp all-purpose flour
2 lemons, juiced and zested (you can use 1 for less of a sour punch)

Preheat oven to 350 degrees F

In the bowl of a mixer, blend together softened butter, 1 cup flour and 1/4 cup sugar. Press into the bottom of an ungreased 8x8 inch pan.

Bake for 15 to 20 minutes, until firm and golden. In the same bowl, whisk together the remaining 3/4 cups sugar and 2 tbsp flour. Whisk in the eggs and lemon juice. Pour over the baked crust.

Bake for 20 minutes more. Let cool for 1/2 hour. The bars will firm up as they cool. Cut into squares and dust with powdered sugar.

**you can double the recipe and put in a 9x13 in pan it's that good!

charley:
what can i say, it was a great dessert and i will be asking her to bring it to work!  if you like the taste of a little butter and the tang of lemon then this one is for you.  i love tart lemon or should i just say i like sour things and this was up my alley as she added a little more lemon.  if only it was healthy for you i would eat the whole thing!


enjoy!

Sunday, June 12, 2011

day 5 = pineapple upsidedown cake

sarah:
after taking the weekend off, it was time to get back to cooking. ever since i made the brownies from the "Ad-Hoc at Home" cookbook (Artisan) by Thomas Keller, i've been itching to continue making some of his recipes. today i made his pineapple upside-down cake. it was fairly simple and came out so light and fluffy i am going to continue cooking out of the book tomorrow!

if you are interested in the recipe, check out the excellent blog by foodgal.com. i used a 9-in dark cake pan (since i don't have a silicone one) and it came out great! i think i need a nap now...

charley:
day 2 of my input and I think I should just start by keeping track of my weight gain.  everything she is making is not horribly bad for you, I just can't keep from eating too much of it.  This falls into that zone as I will be getting up shortly to get my second piece of the cake after typing this up.  It was very light and has great pineapple flavor.  The pineapple wasn't too soft and the cake itself was fluffy.  My only critical comment would be on the cake as I wish it was a little less fluffy, but all in all it still was amazing.  Good balance of flavors and it tastes very light, not heavy at all.  Highly recommended!

enjoy!

Thursday, June 9, 2011

day 4 = oreo bliss

alright... time to change it up a little. since tonight's was soooo good, i'm going to put my comments in and then charley is going let you know what he thought of the food. here it goes...

sarah:
you've got to try this one! i got the recipe from a co-worker today and stopped at the grocery store on the way home to pick up the ingredients. it cost a total of $11.97, but i have an extra bag of chocolate chips (about $3) leftover that i never used. not bad, but you could do better if you hone in on some extreme couponing techniques.

anyway, these really are great. all you do is take a 16.6oz package of oreo cookies (i used reduced fat) and crush them up in a food processor until fine. add an 8oz bar of cream cheese (i used 1/3 less fat) and process until smooth. roll into balls and stick in the freezer to harden. you'll get about 30 pieces.

about 30 mins later, melt one 11.5oz pkg of milk chocolate chips in a microwave bowl on 50% power for 1 min stopping after 30 seconds to stir. after the 1 min is up, stir for a little. put back in microwave for another 15 seconds and stir. if it needs more time, put it in for another 10 seconds and stir again. repeat if needed, but you should still have some chips that have not fully melted. you want this so your last few stirs melt them together (this ensures you have smooth and not clumpy chocolate).

take the balls out of the freezer and use a toothpick or skewer to dip each ball into the chocolate. i dipped them most the way, but you can roll them around so they are completely covered (this may require another bag of chocolate to melt so you may want to buy 2 just in case). after i dipped all of them, i went back over the tops and spread a little chocolate in the space that was open and topped with M&M's and chocolate chips. freeze about 20 mins till firm. this is great because you can do all chocolate or experiment with any topping you like!! 

charley:
Sarah has now asked me to type up my thoughts on each of these meals and I believe this is the start of me getting really fat!!!!  I thought that I wasn't supposed to get fat until we were married, but it seems she wants to start early.  I must say this is the second dessert she has made this week (and for those who know me, that is my weakness, huge sweet tooth).  Both of these desserts, brownies and oreo bliss, will need to make their way to Sarah's office because I will sit down and eat them all in one sitting.  Very tasty and when she first handed me one I didn't know what to expect, but they are deceptively excellent.  Highly recommended and I have requested they be added to the list for her second cookbook!!!

enjoy!